
If you've read up on coding classes for kids, chances are you've come across Scratch, MIT Media Lab's free programming language and online community where kids can create interactive stories, games, and animations. This week, Brains & Motion instructor and STEAM expert Clara B. put together a wonderful Scratch resource to walk your child through developing their own tic-tac-toe game! This short activity is perfect for beginner coders looking to experiment with Scratch's drag-and-drop interface for the first time.
Step 1: Make Your Background
Create a new background by clicking on the background button. Choose the “paint” option in order to draw your own tic-tac-toe board!

You can draw the lines using the paintbrush tool, or use the line tool if you want the lines to be perfectly straight. In this example, I used the line tool.

Step 2: Make a Sprite
We are eventually going to put a “button” in all nine spaces on the tic-tac-toe board so that we have something to click on. Let’s start by making just one. You can make a new sprite by clicking on the “choose a sprite” option on the bottom of the screen. You can then select one of the button sprites Scratch has available. If you would rather draw a button of your own, you can click the “paint” option instead and draw a simple shape similar to how we drew the background.


Once you have your button, we need to add two more costumes for it. A “costume” is just one way that your sprite can look. We want our sprite to have a button costume to start, and then turn into either an X or an O once it’s been clicked. Scratch has pre-made X and O costumes already, so we just need to switch to the costumes tab and add them using “choose a costume.”


Step 3: Make a Variable
When our button is clicked, how do we know whether it should switch to its X costume or its O costume? We’ll have to keep track of whose turn it is. We can do that by using a variable! Switch back to the code tab and click on variables, then “make a variable.” You can name your variable anything you want. I named mine “XorO” in order to remember what it is keeping track of. We can set our variable equal to X when it is X’s turn, and O when it is O’s turn. Now we won’t lose track.


Step 4: Add Code for your Sprite
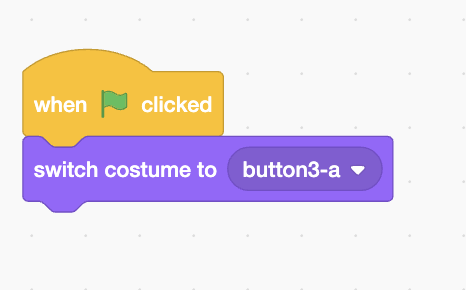
Now it’s time to get coding! We want the sprite to look like a button when the game starts. So, take the “when green flag clicked” block from the events section. We have our sprite start out in its button costume using the “switch costume to” block from the looks section.
We also want to change the costume to X or O when the button is clicked, so grab the “when this sprite clicked” event block. Underneath it, add an if/else block so we can make different things happen depending on whose turn it is. The if/else block can be found in the control section.

If it is X’s turn, then we switch the costume to X. Otherwise, we switch the costume to O. We can check whose turn it is by using the green equals block from the operators section. Put our XorO variable in one side, and type X into the other side to check if it is X’s turn.


But don’t forget, we need to update the XorO variable after someone is done with their turn! After X has taken their turn, it’s O’s turn now, so set XorO to O. After O has taken their turn, set XorO to X.

And that’s all the code you need!
Step 5: Duplicate!
We want all of our buttons to use the same code. So, right click on your sprite and press duplicate! This lets you make nine identical buttons which you can move into the grid. Go ahead and click the green flag to start, and take turns pressing the buttons. You now have a working game of tic-tac-toe!

------
Looking for more fun with Scratch coding? Find a Scratch summer camp near you.